
Booth Design Guide
We love all the ways our vendors express their brands, showcase their creativity and make our show come to life with your booth displays each year. Your booth can be your best selling tool--drawing customers in, telling your story and showcasing off your work--so make it count! We’ve created this handy guide with basic requirements, best practices and extra credit ideas to really make your booth space pop! Make sure to also read through our Booth Design Regulations to ensure your booth is compliant. Last but not least, head over to our Best Booth Pinterest Boards for design inspiration.
Booth building costs will vary, but you can start to get a sense of your estimated costs in this thread in the Facebook Group. We also recommend checking out Light + Paper's booth building breakdown in her OOAK Tips Instagram Stories highlight. View your booth costs through a long-term lens and think of each piece as an investment in growing your business with One Of A Kind. Costs should be amoretized over the years you will be able to use pieces to get a clearer picture of their value. Building a professional booth right out of the gate is a great way to jumpstart sales and customer engagement, but if you need to take it slow, follow booth design pro Diana Watters lead--think about what pieces will make the most impact up front and created a staged plan to invest in other aspects of your display over time.
Need help creating or elevating your booth design? Browse through these suggested service offerings from VM ID to get expert help!
Please Note: When building your booth, the majority of painting should be completed prior to move-in. Limited water-based paint/materials may be used on site. The use of oil-based paint on site is prohibited.
Basic Structure & Actual Dimensions
Your booth will start as a raw space, with concrete floors and a pipe-and-drape structure. These can be the building blocks of your booth, but we encourage you to think about the ways you can elevate your space to create a polished and professional backdrop for your brand.
You may notice that the internal dimensions of your booth space are slightly reduced to account for the pipe and drape structure, which is shared with your neighbors. Your entire display--including tables, chairs, merchandise, signage, walls, flooring and you and your staff--must fit within the confines of the booth size for which you have been contracted.
New clause this year to give some clarity for your booth planning: "No display may be arranged so that an exhibitor must stand in the aisle to conduct business."

Actual Dimensions of a10x10 Booth Space
Contracted Size Actual Size
5 x 10 4'-8" deep x 9'-8" wide
5 x 15 4'-8" deep x 14'-8" wide
5 x 20 4'-8" deep x 19'-8" wide
10 x 10 9'-8" deep x 9'-8" wide
10 x 15 9'-8" deep x 14'-8" wide
10 x 20 9'-8" deep x 19'-8" wide

Actual Dimensions of a10x10 Booth Space

Walls
If there is one thing we could recommend to every exhibitor, it’s hard walls. It's no conincidence that most of the pins on our Best Booth Pinterest Board feature hard wall. Whether you rent them from Stronco, build them yourself or buy them from a fellow maker, they will provide a clean canvas that highlights your work and elevates your brand. Just keep in mind that any hard walls you bring will need to fit within your actual booth dimensions, so as not to encroach on your neighbors' space.
If a hard wall structure is just not in the budget, we recommend looking into a heavier drape that will add weight and substance to your booth. Make sure to bring S hooks to hang your curtains from the pipe structure, as it is shared with your neighbor, so cannot be draped into their space. Or try mixing a hardwall at the back with curtained sides for a polished but more budget (and storage) friendly display.
Whatever you choose, we advise that you stay away from grids. We know they can be tempting, especially when there is lot to hang, but as of 2020, grids are no longer allowed in the show so you need to make alternative plans.
Last but not least, make sure your display makes the most of vertical booth space, but keep all display, lighting and signage within the 8’ height limit.
We encourage the use of a hardwall structure to provide a professional backdrop within your booth.
5'x10' Hardwall Booth (starting from $782)
10'x20' Hardwall Booth (starting from $1572)
This is an example of Exhibitor provided hardwalls in a 5x10 booth
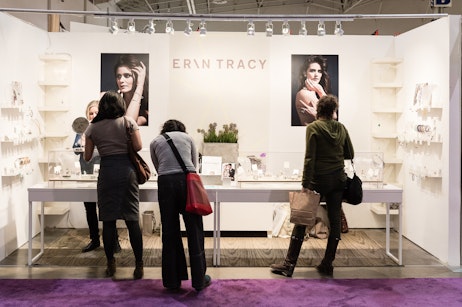
This is an example of exhibitor provided custom hardwalls in a 10x10 booth

This is an example of Stronco supplied harwalls in a 10x10 booth

This is an example of an exhibitor provided dropdown wall in a 5x10 booth

This is an example of Stronco provided hardwalls with Exhibitor provided shelving

This is an example of Exhibitor provided hardwalls being decorated to create a different aesthetic

This is an example of Exhibitor provided hardwall being used to create dimension within the booth
Flooring
What you do for flooring is entirely up to you. Carpet, rugs, peel-and-stick and interlocking mats are the most common choice, and some opt for the bare concrete. If you choose the latter, we recommend you invest in a standing mat to save your knees for the long days on your feet. Check out our Best Booth Pintrest Board to see different kinds of flooring in action at the show. Flooring is also available for rent through Stronco, if needed.
The exhibit hall has a cement floor with electrical ports in it. You may bring carpet or another type of flooring to cover it.
Carpet available from Stronco (starting from $2.43 / sq ft)

An example of Exhibitor provided carpeting being used to bring a cozy feel to the booth

An example of an Exhibitor provided hardwood laminate option

An example of an Exhibitor provided hardwood laminate option
An example of Exhibitor provided carpeting

An example of Exhibitor provided carpeting being used to tie in the theme of the booth
Lighting
We dim the overhead lights in order to create an intimate shopping experience in our massive show halls, so bad lighting will make your booth stick out in the worst way. Don't believe us? Take it from your fellow exhibitors!
First, you’ll need to order electrical through the venue. Consider where your electrical outlet will be placed within your booth and make sure you can access the plugs and switches you will need to easily turn your lights on and off each day. Then, create a lighting plan that draws customers into your booth. We’ve heard it recommended that you use at least 1 light per foot of booth wall, but we encourage you to play around and figure out what best works for you. Lighting is available for rent through the venue, from clip ons to overhead spotlights, or you can buy your own lights like the ones suggested in this thread in the Facebook Group. Also consider the mood of your lighting—do you want a crisp white, warm yellow or light wash?
All exhibitors should plan on lighting as part of their booth design as the overall show lighting may not be optimal brightness for shopping.
LED or Source 4 Par - ceiling mounted fixture (starting from $325)
Wall washing arm lights (starting from $209)
Each of these fixtures can cover approximately 10'x10'.
Arm lights must be secured to a back wall and cannot be secured to a draped booth. These should be placed approximately every 4'-5' along your back wall.

SHOWTECH provided arm lights that have been used to provide a warm yellow wash

SHOWTECH provided high bays available to be ordered on the SHOWTECH portal linked on the Service Order Forms page.

SHOWTECH provided arm lights that have been used to provide a cool white wash

SHOWTECH provided arm lights

SHOWTECH provided arm lights

SHOWTECH provided arm lights
SHOWTECH provided arm light being used to create a crisp white wash

SHOWTECH provided arm light being used to create a white wash
Layout
The best layout for your booth will depend on your products, so first let’s run through some basics questions you should consider, and then we’ll discuss best practice to make the most of your space.
- Where will transactions take place? Place yourself where you can be available but won’t impede others’ shopping experience when you are processing a transaction. And, as a safety precaution, make sure your transactions take place somewhere you can still keep an eye on your booth space.
- Where will customers enter and exit? Shoppers may pass you by if they feel like they will be trapped in your booth or cannot enter discretely. Make sure customers have the space to browse without engaging with you or your staff and that there is enough room for multiple customers to enter and exit the booth without being trapped.
- Who are your customers? Take into consideration any needs specific to your customers. If you sell products to new moms, ensure there is room to navigate your space with a stroller. If you will be sampling, make sure you create enough space to avoid roadblocks or crowding your neighbor’s space as people line up to try.
On that note, try to build storage into your booth space, for both your product and your personal belongings. Ideally, you should be able to hold a day’s worth of stock, but whatever you can spare will save you time. Onsite storage is available for rent, if needed.
Today's shopper is looking for more than retail therapy--they want retail-tainment, and you've got top billing! Think about creating a demo or workshop area in your booth where you can make your product or demonstrate part of your process. You’ll educate shoppers about the value of your craft, invite questions and natural selling opportunities and create the kind of experiential shopping experience modern customers crave. Plus, it keeps you productive and passively selling—instead off on your phones—during less busy moments at the show. Click the images below to learn about how MEC and Canada Goose are successfully implementing retail-tainment in their physical spaces.


Looking for other ways to incorporate retail-tainment into your booth display? Consider also setting up a vignette of your products in use or a photo-ready display that attracts and connects customers with your products. We've always found great success incorporating photo activations (below) into our centre display! Not only will you encourage casual visitors to come play in your booth, but they'll also spread the word to their followers when they post their photos. See great examples of photo activations from exhibitors Woo Woo Lab and The Candi Factory.


Furnishings
Furnishing and fixtures will differ for everyone based on the products you are selling. Think of what shapes, sizes and configurations will put the highlight on your unique pieces. Then get crafty with sourcing options:
- Check out our Items For Sale unit in the Facebook Group to see if any vendors are selling fixtures that might work for you.
- Work with what you’ve got—borrow pieces from your home or pull out pieces from storage to create a well-rounded display.
- Get creative! Visit garage sales and pick up pieces that could be as good as new with a quick coat of paint.
- Join the masses who head to IKEA before the show each year to pick up cheap and cheerful furnishing to perk up their space.
- Or rent display pieces like tables or counters from our show decorator, Stronco, beforehand or at the onsite order desk.
One thing we have learned, that applies across the board--chairs don’t sell! We know that you will want the option to sit in your booth over the course of the show, so we recommend a stool, like this one, which will give you a place to rest but leave you ready to launch as soon as a customer enters your booth.
Merchandising
According to WGSN, a leading trend forecasting agency, low impact consumerism is becoming mainstream, as everyone knows that we should not be putting more stress on our planet. In this climate, the “more products equal more sales” strategy is starting to fray. Consumers today are overwhelmed with choices, and the more clutter in your storefront—be it in person or online—the more likely it will drive shoppers away because they don't know where to start.
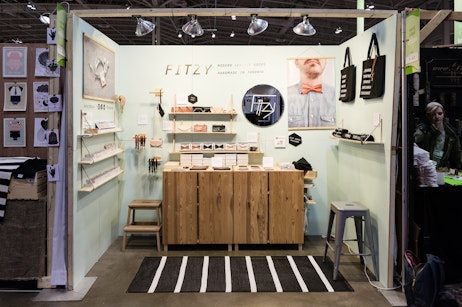
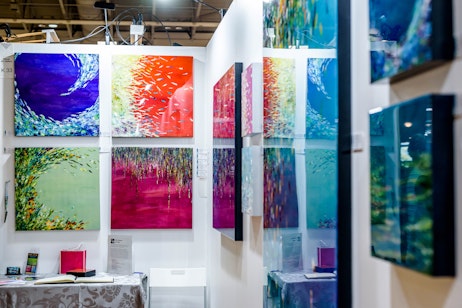
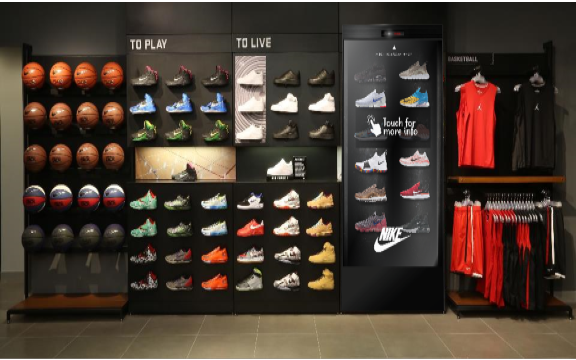
You have the time it takes a casual customer to walk the frontage of your booth to capture their attention, so it is important that your booth display clearly and concisely communicates your brand and what you sell. Think of your booth as a showroom for your work, rather than a traditional retail shop. Put the focus on highlighting special features or showing how products fit into your customers' lifestyle, instead of overcrowding your display with duplicate product. And take advantage of any tactile, real-world features or experiences that can’t be communicated online. We love these great examples of artful product merchandising from exhbitiors Lily Kao Design, Artech Studios, Katie Fortier and Fitzy. Check out these great examples (below) and read how North Face is pioritizing the Experience Economy over shifting units in their new New York retail space.

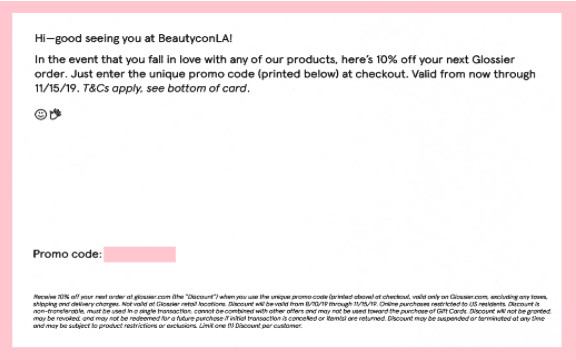
With the buffet of outlets available to modern shoppers, the function of shows has broadened. We know that, at the end of the day, sales numbers carry heavy weight, but we encourage you to also view your time at the show as crucial to building in-person relationships. Today, customers need an average of almost six touchpoints with a brand before deciding to make a purchase so, while not all onsite interactions will lead to immediate sales, they are an invaluable part of the conversion process. Consider how your booth space draws connections to your brand purpose and your maker story. Take advantage of face-to-face time to build lifelong customers relationship, get immediate product feedback and demonstrate physical features that can't be communicated online. And make sure shoppers are leaving your booth with a way to connect with you again. This can be as simple as encouraging newsletter sign ups and following on social media, or sending them home with an incentive to follow through on their browsing or make a repeat purchase. We love these great examples that Aveda and Glossier created for Beautycon attendees (below).

Signage
Signage will be how shoppers find your booth at the show. Whether tracking you down from the Show Guide or stopping in their tracks to come over and investigate, customers should be able to easily identify your company name and should get a good sense of what you sell as they pass by in the aisle. And note that your signage needs to remain within the 8’ height limit of your booth space and should not include any on-the-fly handwritten elements. Check out these helpful examples of clear signage from Coleur-Moi, Vancouver Candle Co, Abeego, Surfing Ninjas and Rob Croxford.
And on a more micro level, it is important to make sure that your products are well-labeled and clearly priced so that shoppers can quickly and easily discern what you are selling and have the option to browse without engaging.
Be On Brand
To give each of our shows a distinct look and feel, while maintaining our familiar brand, we’ve introduced show themes. Each edition, at both Winter and Spring, has a new set of complementary colours and a distinct show and competition theme that you can incorporate into your marketing, branding and booth display.
Colour Palette
Brand Colours

Cream
HEX: #F9F1E1
RGB: 249 241 225
CMYK: 0 4 11 0
PMS: 9184 U

Black
HEX: #000000
RGB: 0 0 0
CMYK: 0 0 0 100
PMS: Neutral Black U
Budgeting Checklist
Please refer to the Service Order Forms Page for additional budgeting considerations to take into account while planning your booth designs.