We Will See You Soon:
- 00Days
- 00Hrs
- 00Mins
- 00Secs
Design a Booth That Sells
Your booth is one of your most powerful tools at the show; it should immediately communicate who you are, draw people in, and make your work easy to explore.
This guide breaks down everything you need to design a booth that feels intentional, welcoming, and built for connection.
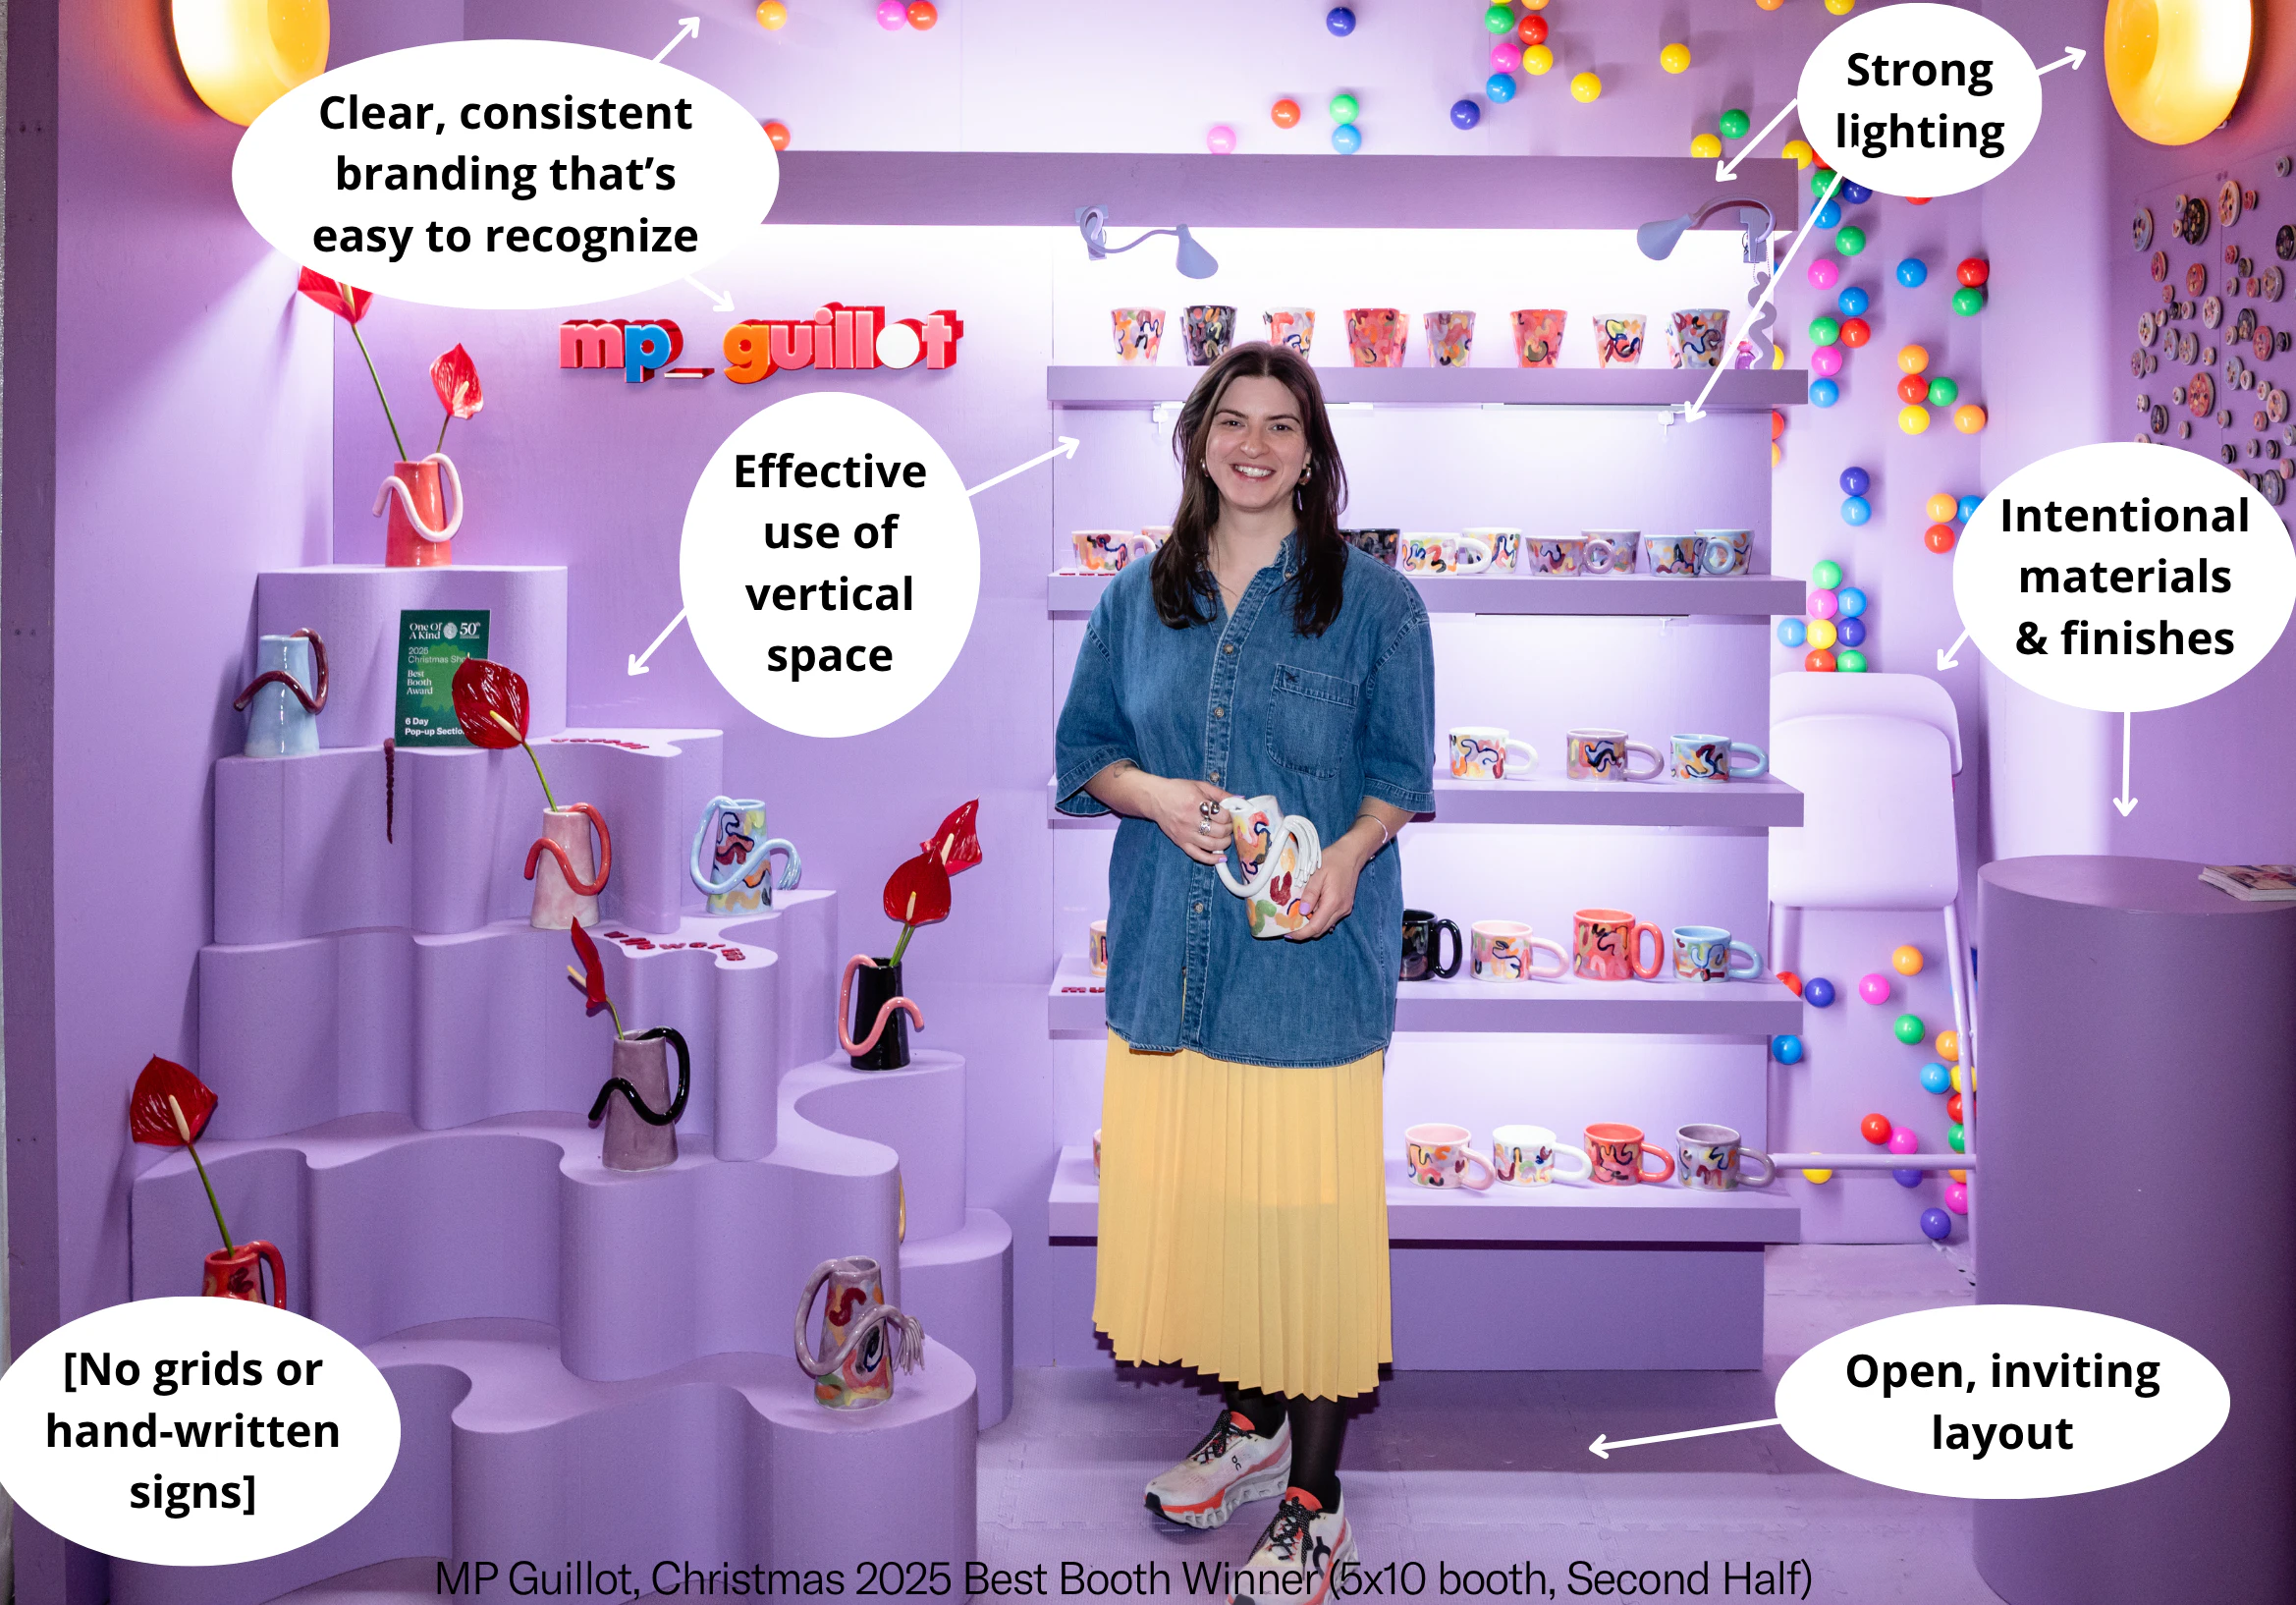
Start by exploring the key elements below (What Makes a Strong Booth). In the image, you’ll see how each one comes together inside a real booth space.
At a Glance: What Makes a Strong Booth
✔ Strong Foundations (Walls & Floors)
Your booth structure sets the tone - clean, intentional surfaces create a polished base for everything else.
✔ Strong Lighting
Good lighting makes your work visible, inviting, and impossible to overlook.
✔ Clear, Consistent Branding
Your booth should communicate your brand instantly, even from across the aisle.
✔ Open, Inviting Layout
A clear entry point encourages visitors to step inside and explore.
✔ Effective Use of Vertical Space
Height helps you stand out in a busy show environment and adds visual impact.
Booth Sizes & Space Planning
Understanding your booth size is the foundation of strong design. Layout, flow, and product density should all respond to your footprint.
Your booth is a raw space with concrete flooring and a shared pipe-and-drape system. While booth sizes are standardized, usable space will be slightly reduced due to these shared structures and neighbouring boundaries (5' depth becomes 4'-8" depth and 10' becomes 9'-8").
Please plan accordingly and ensure your entire display, including all fixtures, merchandise, signage, flooring, and staff, fits fully within your contracted booth dimensions. No display may be arranged so that an exhibitor must stand in the aisle to conduct business.
See the image to the right for the actual dimensions of a 5x10 booth space.

Planning Your Layout by Booth Size
10x10 Booth
Most flexible booth size, allowing for clear zoning and strong storytelling opportunities.
- Best for showcasing a full product range
- Supports distinct areas for display, checkout, and storage
- Works best with a clear, front-facing layout
5x10 Booth
A narrower footprint that requires intentional flow and strong vertical use.
- Prioritize a single, clear entry point
- Use height to maximize visibility
- Keep layout simple, focused, and uncluttered
Larger / Corner Booths
More space offers opportunity - but only when used intentionally.
- Create defined zones rather than spreading product thinly
- Use sightlines to pull visitors deeper in
- Maintain clear focal points to avoid visual overwhelm
Foundations: Walls & Floors
Before you think about styling your booth, start with the foundation. Your walls and flooring define the structure of your space and set the tone for everything inside it.
Walls
Your walls do more than enclose your space - they frame your brand and shape how customers experience your booth.
Hard walls are highly recommended:
- Create a clean, professional backdrop that helps your work stand out
- Act as a “blank canvas” for your brand
- Define your space and support vertical merchandising
- Treat your back wall as your primary brand statement
- Use walls to create structure and visual focus
- Incorporate shelving, hooks, or display systems to add depth
- Avoid large blank or unfinished surfaces
- Ensure everything stays within your contracted booth dimensions. Click HERE for more info
- 5'x10' hard wall booths (starting from $850) and 10'x10' hard wall booths (starting from $1,250) are available
If hard walls aren’t possible:
- Use heavy, high-quality draping instead of standard pipe-and-drape
- Hang using S-hooks on the shared structure without encroaching on neighbouring booths
- A hybrid approach (hard back wall + draped sides) can be a strong, cost-effective option
Not permitted: grid-style displays. Maximize vertical space, ensuring all elements stay within the 8’ height limit.
Floors
Flooring quietly influences how polished and intentional your booth feels.
Flooring is available for rent through Stronco if needed. The exhibit hall has a concrete floor with built-in electrical ports, and exhibitors are welcome to bring carpet or other flooring to cover it. Carpet rentals are also available through Stronco (starting from $2.55/sq ft).
Tips:
- Use flooring to clearly define your booth footprint
- Keep surfaces clean, consistent, and intentional
- Consider rugs, wood finishes, or modular flooring for warmth
- Avoid mismatched or visually distracting floor treatments
- Click HERE for flooring regulations

Exhibitor-provided carpet being used to bring a cozy feel to the booth
Exhibitor-provided hardwood laminate option
The 4 Pillars of a Successful Booth
1. Lighting
At the show, overhead lighting is dimmed to create a warm, inviting atmosphere - so your booth lighting is essential (and mandatory). The right lighting highlights your work, enhances colour, and helps draw visitors in.
Plan for lighting early by ordering electrical through the venue and considering outlet placement for easy access to switches. Build a lighting plan that supports how customers experience your space, aiming for roughly 1 light per foot of booth wall as a general guide.
Lighting is available for rent (including clip-ons and overhead fixtures), or you can bring your own. LED or Source 4 Par ceiling-mounted fixtures (starting from $325) and wall-washing arm lights (starting from $209) can each cover about a 10’x10’ area. Arm lights must be secured to a solid back wall and placed every 4’-5’.
Simple and affordable additions like string or fairy lights add ambience, while clip-on or LED lamps provide focused lighting. Consider the mood of your lighting - do you want a crisp white, warm yellow or light wash?
For practical inspiration, check exhibitor discussions in the Facebook group and review SHOWTECH lighting examples to see real booth setups.
Tips:
- Use multiple, evenly distributed light sources
- Eliminate shadows on key products
- Combine ambient and task lighting
- Test your setup before show day

Well-Lit Booth

Poorly Lit Booth
2. Layout
Your layout should feel open, clear, and easy to navigate. Think about how customers will move through your space, where transactions will happen, and how to stay accessible without blocking flow.
Choose furnishings and fixtures that support this flow. Mix rented, sourced, or repurposed pieces (such as IKEA items, vintage finds, or storage from home) to create a functional setup that keeps pathways open and the space uncluttered.
Keep entry and exit points clear so visitors don’t feel trapped, allow space for browsing, and consider your audience’s needs (e.g., strollers or sampling). Add hidden storage wherever possible to keep your booth organized.
A small demo area can also help engage shoppers and showcase your process.
Tips:
- Keep the front of your booth open and accessible
- Avoid barriers at the entrance
- Plan for customer needs
- Guide visitors naturally through your space
- Include storage where possible
- Avoid chairs - opt for a stool (like this one) so you can rest while staying ready to engage with customers

Strong Layout: Open & Guides Visitors Naturally
Poor Layout: Blocked Entrance & Disorganized Flow
3. Vertical Space
Height adds visibility and impact in a busy show environment. It also allows you to display more without overcrowding your tables.
Tips:
- Incorporate shelving, risers, or hanging elements
- Place signage above eye level where possible
- Build visual layers to add depth
- Maximize vertical storytelling by guiding the eye from table level to higher focal points, not just ground-level displays
- Avoid overcrowding - clarity helps your vertical display stand out.
4. Branding
Your booth should communicate your brand clearly and consistently. Strong branding helps you stand out and stay memorable.
Signage must stay within the 8’ height limit and be clean and professional. Handwritten signs are not permitted, and vinyl signs are strongly discouraged. Products should be clearly labeled and priced to support self-serve browsing.
Tips:
- Display your logo clearly and consistently
- Stick to a defined colour palette and material story
- Keep signage clean, simple, and professional
- Align your booth design with your brand personality (minimal, bold, playful, refined, etc.)
- Label and price products clearly

Do's and Don'ts
✔ Do This
- Use bright, layered lighting
- Keep your layout open and inviting
- Curate your product display
- Use clear, professional signage
- Create a cohesive look
- Build with walls or structured displays
✘ Avoid This
- Rely on dim or overhead lighting
- Block the entrance with tables or displays
- Overcrowd your tables
- Use handwritten or unclear signage
- Mix mismatched materials and styles
- Use grid walls or unfinished setups
Why It Matters
- Good lighting draws attention
- An open entry invites visitors in
- Too much product can overwhelm and dilute focus
- Strong branding builds trust and improves recall
- Consistency creates a polished, intentional look
- Structured displays elevate your brand & presence
Resources
Booth Design Regulations
Review the official booth regulations to ensure your booth meets all compliance standards before move-in.
Inspiration Boards
Explore our Best Booth Pinterest Board featuring standout booth designs across categories to spark ideas for your own space.
Booth Cost Insights
Get a sense of real exhibitor experiences and estimated build costs through community discussions in this OOAK Artisans Facebook Group thread.
Experienced Exhibitor Booth Breakdown
Gain insights from real booth builds and practical tips shared by experienced OOAK exhibitor Light + Paper in their OOAK Tips Instagram Stories highlight.
Professional Support
Looking to elevate your setup? Explore VM ID’s services and exclusive OOAK offerings for expert booth design support.
Important Note on Booth Builds
Most painting and finishing work should be completed prior to move-in. Limited water-based materials may be used on site. Oil-based paints are not permitted during setup.
Sustainability Quick Start Guide
Review this guide for simple ways to reduce waste, make more sustainable choices, and support One Of A Kind’s sustainability goals during your participation in the show.
Booth Design Checklist
To help you bring everything together, we’ve created a simple, step-by-step Booth Design Checklist you can follow as you plan and set up your space. Use it as a practical tool to stay organized and ensure nothing is missed - from early planning through to show day.